Description
The following Procedure describes how the Datapel Warehouse Management System is used to perform an inventory stock take or stock count.
It is common for ALL warehouses to have mismatches between recorded stock OnHand (SOH) quantities and actual stock on shelf (SOS) quantities. These count errors are normally attributed to stock theft, incorrect picking of orders, loss or misplacement of stock, poor returns management procedure, and incorrect item counting at goods inward.
This document is intended for the warehouse manager and describes by example the use and configuration of the Datapel Warehouse Management System for stock counting, stock adjustment, and handheld scanner procedures.
This document assumes the reader is familiar with WMS and MYOB accounting software, and has basic accounting/stock control procedure training.
Detail Steps
Setting up the Handheld
The Denso BHT-300 requires software to be uploaded to the unit in order to gain the functionality needed to perform the tasks in the warehouse environment. If you have purchased your handheld from Datapel Systems then the necessary software will be preloaded for you.
If you have purchased your own Denso BHT-300 then contact Datapel Systems to purchase the software license required to run on the Handheld.
This procedure outlines workflows for two BHT-300 different configurations:
BHT Dock and manually synchronising via the DENSO cradle;
In this configuration the TOOLS/HANDHELD menu option is used to send and receive data files to and from the handheld device once it is placed on the cradle.
Wireless Access Point (WAP), FTP Server, and BHT-300BW device;
In this configuration, the BHT-300 and WMS automatically send and receive data files to and from the handheld device using a WIRELESS connection and an FTP SERVER.
The details of the wireless network and the FTP server need to be configured into the DENSO handheld and into the preferences of the WMS. The WMS can be set to AUTOMATICALLY read and write information from the BHT-300 by running as a service under a user account reserved for Datapel and the WMS.
The first part of this manual describes BHT Dock setup. It is recommended that you read BOTH sections when setting up the Wireless DENSO. Although many of the initial steps for USB to SERIAL driver and connection setup are not required.
Preparing WMS for communication with the Handheld
The Denso BHT-300 series communicates through a USB docking cradle. This cradle using a USB cable to connect to the PC and Infra red to communicate to the handheld. The handheld will charge while the USB cradle is connected via the USB. The USB cradle requires drivers to communicate with the PC. These drivers must be installed before trying to connect the USB cable.
Use Windows Explorer to browse to the folder C:\Program Files\Datapel Systems\Common\Drivers\ and run the DensoActiveUSBCOM.exe file. Follow the wizard through to install this package.
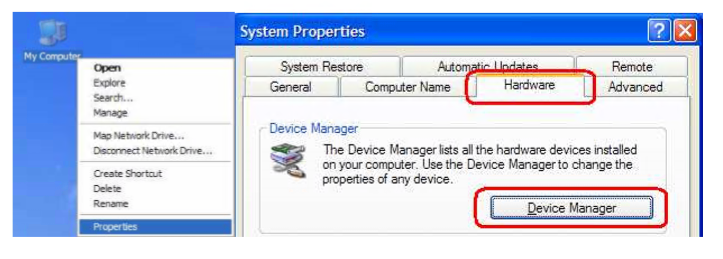
Once you have successfully installed the driver, you can now connect the cradle to the USB port. Once the cradle is connected, open up Control Panel and then open System. The system properties will now show. Alternatively, right click on My Computer and click Properties from the popup menu. Next, click the Hardware tab and press the Device Manager.
This will open the Device Manager which lists the hardware of the computer. Scroll down the list to find Ports. Branch out the Ports using the plus sign and find the DENSO WAVE Active USB-COM Port (COMX) > Connected. There may be more than one listed but only one of them will say “Connected”.
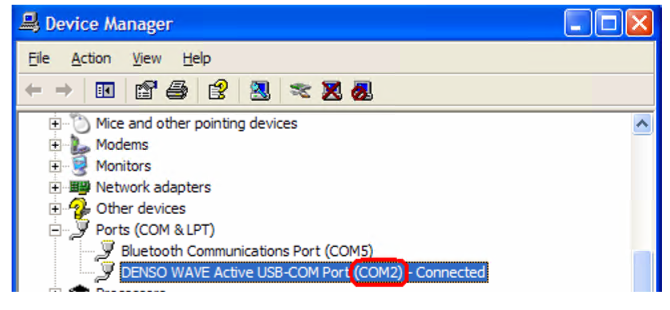
The information that you need here is the port number. In this example, it is COM2. You will need this in the following steps.
In the WMS application folder, you will find a file called ‘coms.ini’. Browse to this folder with windows explorer and open the coms.ini file. The only line that you should need to change in this file is Line 1.
Line 1 > This is the port number that you collected before
Line 2 > Path of the files to be uploaded to the handheld
Line 3 > Path of the files downloaded from the handheld
Line 4 > Path of the CSV files that are created
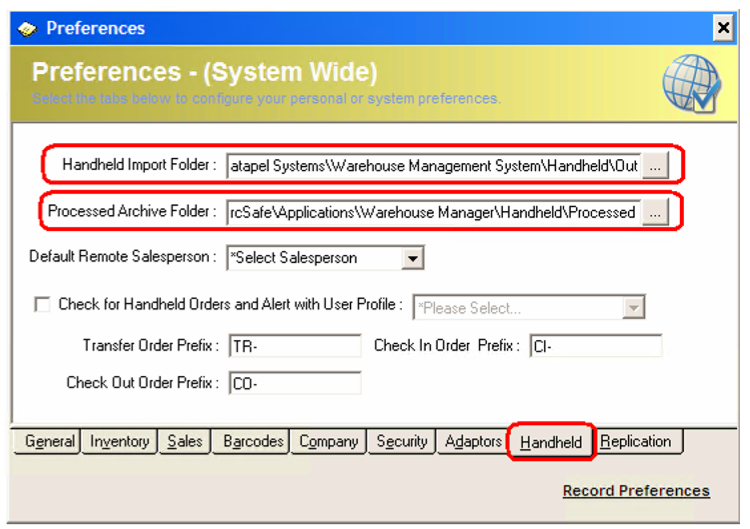
The last step of setting up communications for the handheld is in the preferences in WMS. Open WMS and log in as “Superuser”. Open the Preferences by clicking Tools > Preferences in WMS. Click the Handheld Tab.
Set the Paths for the Handheld Import Folder and for the Processed Archive Folder using the button next to the field. The recommended paths are:
Handheld Import Folder: C:\Program Files\Datapel Systems\Warehouse Management System\Handheld\OUT
Processed Archive Folder: C:\Program Files\Datapel Systems\Warehouse Management System\Handheld\Processed
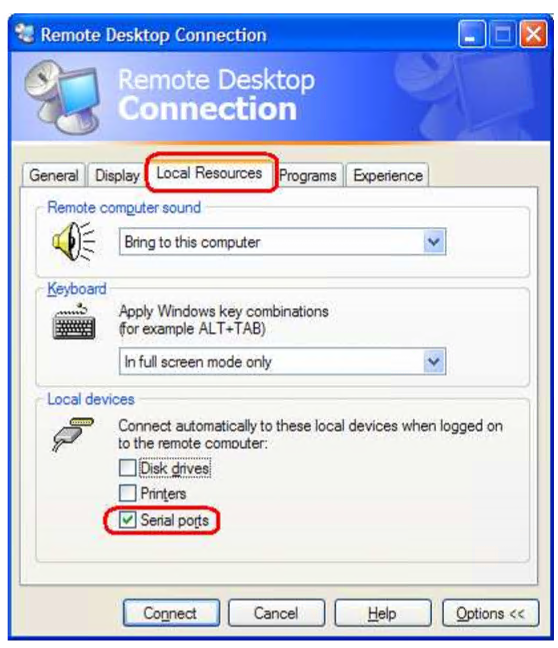
If you are connecting to a server through terminal services or an RDP connection, you need to set the properties of the connection to connect the serial ports to the server.
Right click on the shortcut for your WMS session on the server and click Edit.

Click on the Local Resources tab and make sure that the Serial ports is ticked.
Click the back on the General Tab and press the Save as button at the bottom of the window. The Save dialog will popup and it should default to the same location and name as it already has. Save and overwrite the existing shortcut.
Once you have changed the shortcut, you should now be ready to start using the handheld with WMS.
Updating the data stored on the handheld
The handheld contains lists of data that are needed when using the programs such as stocktake. It is important to update the scanner often as changes in WMS need to be kept up to date on the handheld.
Open the Handheld screen in WMS by clicking Tools > Handheld. The screen will look like below image:
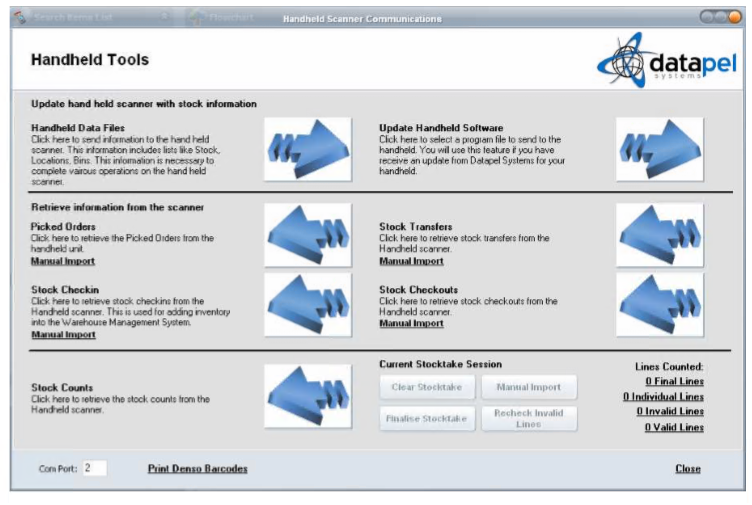
Make sure that the Com Port at the bottom reflects what you entered in the “Coms.ini”.
Make sure the Handheld is docked in the cradle and turned on. From the main menu, press 4 on the handheld for PC Communications. Now, press the Arrow button that corresponds with updating the handheld.
If the settings are all correct, then the system will now be compiling the data files and sending them to the handheld. This may take a few minutes to complete.
Preparing FTP Server for Wireless Handheld Communication
The Denso BHT-300W series can communicate via FTP (file transfer protocol) using a wireless access point.
It is recommended your IT Consultant assist you in setting up the FTP server. We recommend FileZilla; this is a free product that provides all the features required to operate WMS and the DENSO Wireless handheld. The application can be downloaded from: http://filezilla-project.org/
In order to allow the FTP Server and Clients to communicate, your Windows Firewall, Router/Network Firewall, or your Installed Virus Protection application will need to enable PORT 21 and PORT 14147.
To help provide security for your Windows computer, Windows Firewall blocks unsolicited connections to your computer. This includes blocking the ports required for an FTP client to connect to the server. In order to use the server with Windows XP SP2/2003 Server you must configure Windows Firewall to allow incoming connections through port 21 by doing the following:
1. Open Windows Security Center in the Control Panel.
2. Click or launch Windows Firewall under the heading Manage security settings for.
3. Click the Exceptions tab and then click Add Port.
4. Enter FTP in the Name box.
5. Enter 21 in the Port box.
6. Leave TCP selected and click OK.
For more detailed information regarding Windows Firewall configuration follow this link: http://technet.microsoft.com/en-au/library/bb877979.aspx
Creating WmsService User Account
It is recommended that a new Windows or Server User Account be created with Administrator Rights and that the following FTP Server installation procedure be complete logged in as that User.
From Control Panel or Administrator Tools, choose New User and create an Account called WmsService. Please contact your IT Consultant if completing this activity on a Windows Server.

Log-off and Log-on as the WmsService User allowing Windows to create the User Account Profile for the first time.
It is recommended that after the entire installation procedure completes, you restart the Application Server PC.
Once the system restarts, verify the FTP Service is operating as expected and the WmsService user can log into the WMS and MYOB applications as SUPERUSER and as ADMINISTRATOR respectively.
Installing FileZilla FTP Server
Once logged in as the WmsService or Administrator account run the downloaded installation package and choose the settings as shown.
1. Standard Installation.
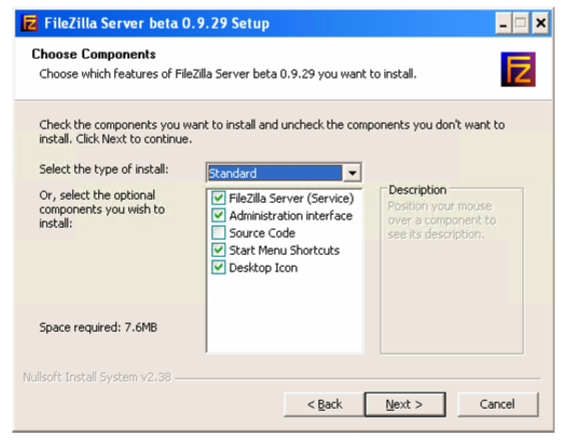
2. Allow service to start with Windows.
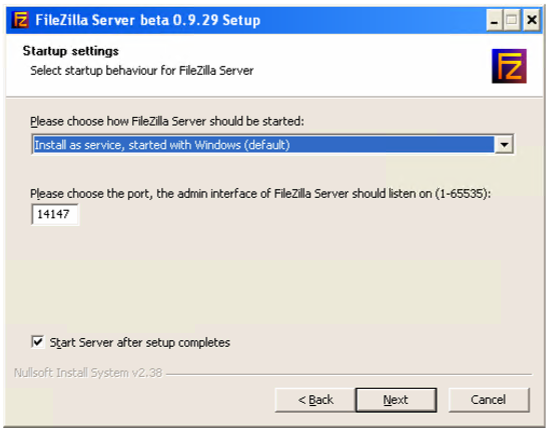
3. Allow FTP Server Management Console to be started when the WmsService User Logs in. This can be disabled once you are satisfied the system is configured correctly.
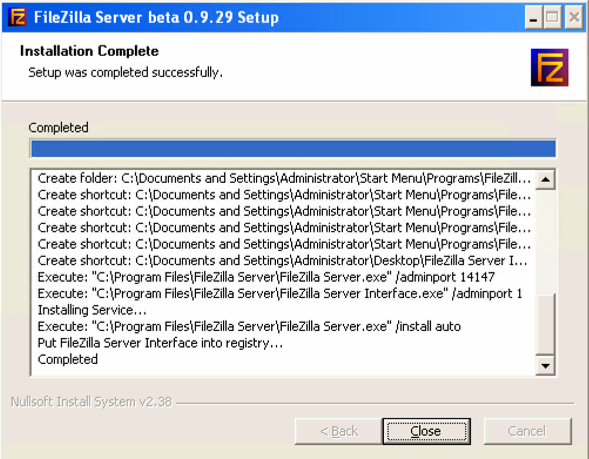
4. Installation should now complete normally.
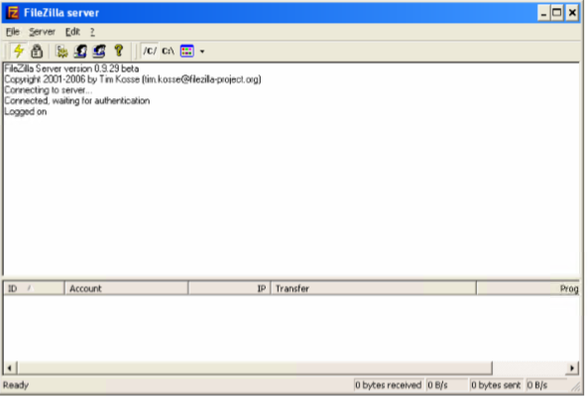
Verifying FileZilla FTP Server is operating
Once logged in as the WmsService or Administrator account open TASK MANAGER by right clicking on the task bar and selecting Task Manager.
The FileZilla server.exe should be running as a SYSTEM task. If you can not locate the IMAGE/PROCESS NAME, restart Windows and try again.
Configuring FileZilla FTP Server for Handheld(s)
FileZilla provides an FTP Server Management interface that can be password protected. To login to the server, choose FileZilla Server Interface from the Start/Program Files/FileZilla menu option.
The FTP Server Management interface allows you to monitor and log activity on the FTP Server and create new user accounts.
In order to operate the Wireless Denso Unit with WMS, an FTP Server User account for Datapel must be created.
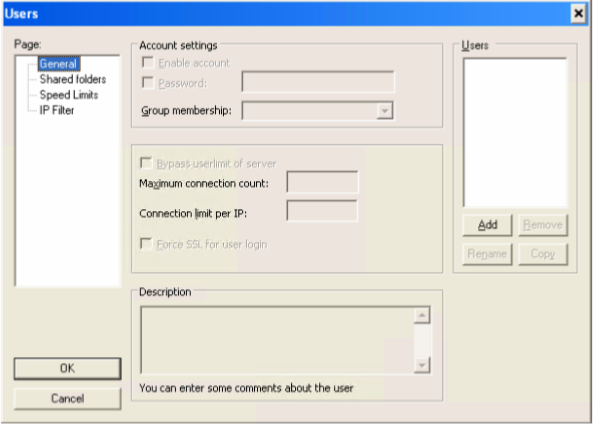
From the General Page: Click Add from the Users frame.
Enter the User name datapel as shown below.
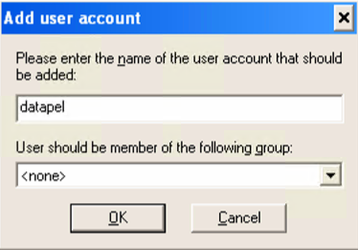
A password is necessary and will need to match that configured for the handheld NETWORK.DAT file.
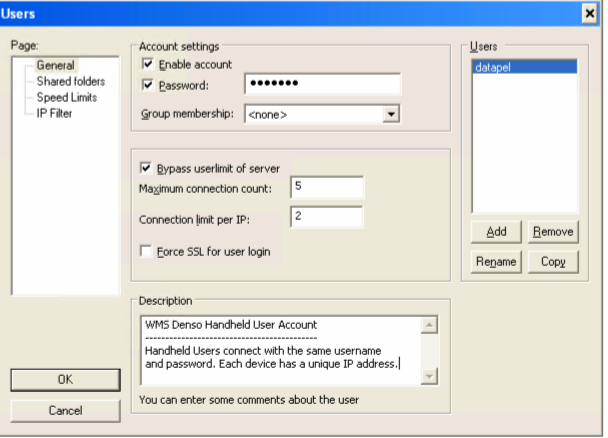
It is recommended that the above page be copied EXACTLY with the connection count always set to a minimum of 5 and the limit per IP set to 2.
Configuring required FOLDER structure and Home Directory
Like the Denso Cradle, setup a set of folders are necessary to organise the files into those being sent and those being received by the Handheld device. Below shows the folder structured required by WMS in order to operate with the Wireless Denso Unit.
Choose the Shared folders Page: Add the \handheld path as the users HOME directory by first Adding the Folder path then clicking Set as Home Dir.
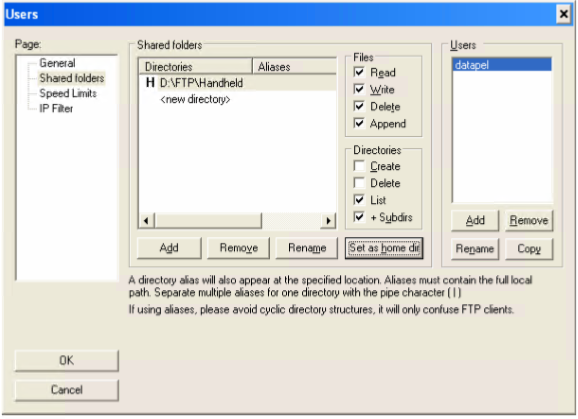
Select <new directory> then click REMOVE.
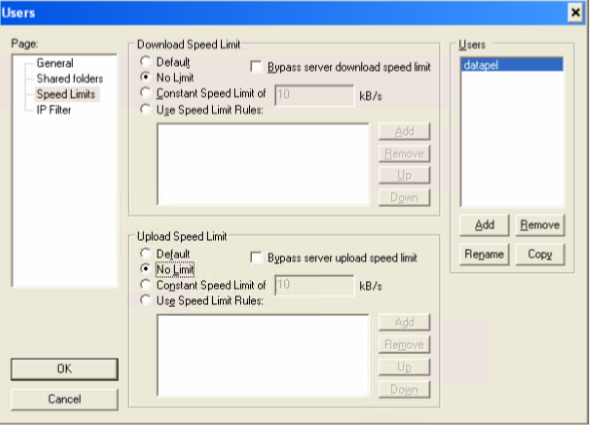
Choose the Speed Limits Page: Set No Limits as shown.
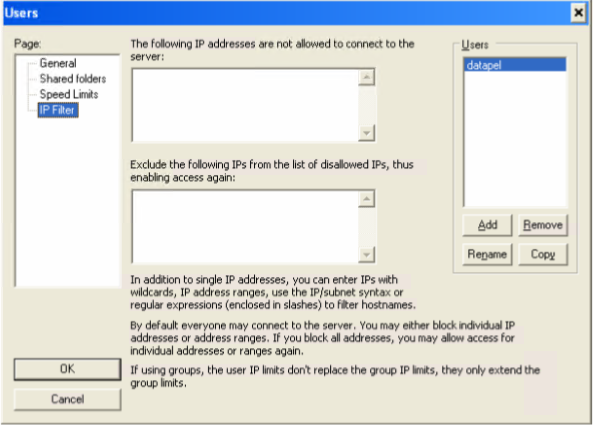
Choose the IP FILTER Page: Do not set Filters until after operations with the handheld have been verified.
Initial Testing of the FTP Server
Before attempting to configure the Handheld for remote FTP connectivity, it is a requirement that the local FTP server be checked.
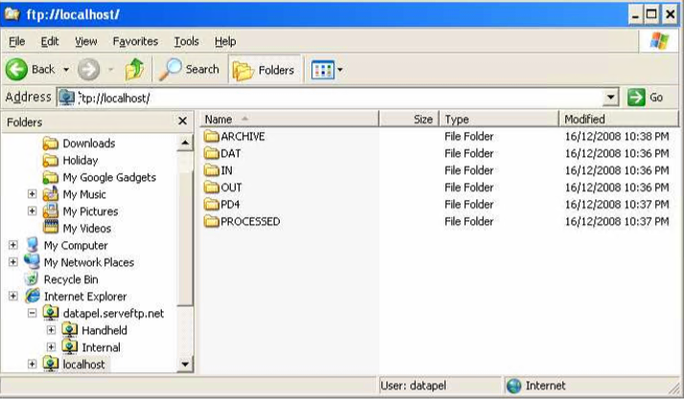
To test the FTP Server locally type ftp://localhost/ into Windows Explorer.
Enter the username and password as datapel. Using the FileZilla server management interface, you can review all connection activity and address any connection errors or restrictions shown.

Use PING to check IP connectivity and firewall settings are correctly allowing access to the FTP Server from the local network, other sessions, and client computers.
Testing the FTP Server for Remote Communication
Once FileZilla or equivalent FTP Server software is installed and running you are required to test the connection and associated folder access rights for the datapel user.
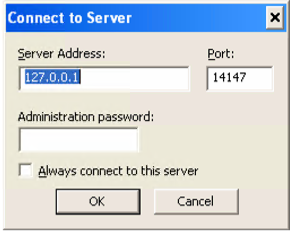
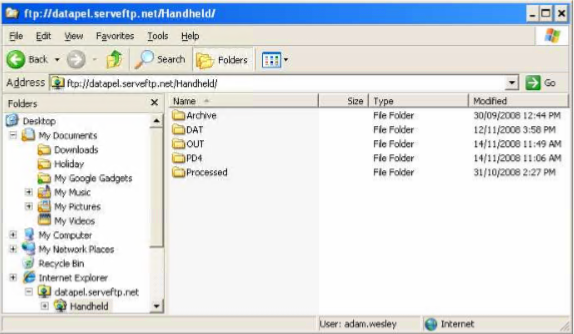
From Windows Explorer, type the IP address of the FTP server prefixed by ftp:// as shown below.
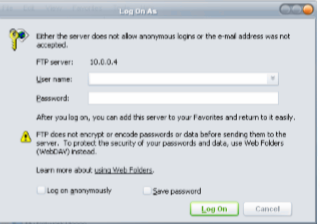
You will first be prompted to enter your username and password. The default settings should be datapel as username and datapel as password.
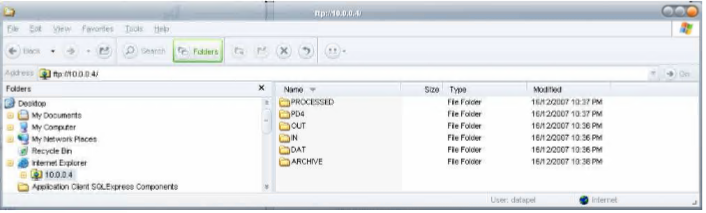
If the login is successful and the server is running, the following window will display and show the folders previously setup on the server pc.
Check a file can be written, read, and deleted from each folder.
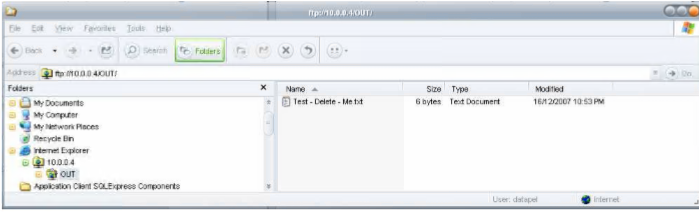
To add a file create a text file on your desktop, drag it into each folder. To remove the file, right click and choose Delete.
Preparing for Wireless Communication
The following assumes a Wireless Access Point and network is operating and that the MAC addresses of the Mobile Denso Handhelds are enabled within this network. It is recommended that each handheld should be allocated a FIXED IP address on the Wireless Network to simplify trouble-shooting and connectivity issues.
The area in which you wish to use the scanner to upload data collected must be covered by the wireless network.
The handheld will batch information when not in wireless coverage and can be triggered to send to the server once back in range again.
It maybe necessary to use multiple Access Points in bridge mode for extended coverage. Two or more access points can be setup with only one unit physically connected to the LAN and the others bridging from the first. The higher (vertical height) the access point antenna is mounted the greater the performance and range of service.
Wireless Network Information
You will need the following information to complete wireless configuration: IP Address(es) of the access points, server IP address, gateway and the Scanner IP Address(es), wireless WEP Key and finally the SSID of the wireless network.
An FTP service must be available for the handheld to connect to as described in the previous sections.
The handheld folder on the FTP server requires subfolders DAT, OUT, PD4 and Processed. The handheld folder needs to be created in a location where the WMS application can access the folder directly, either through the Network Eg. \\server\ftp\handheld\ Or locally Eg. C:\WMSData\ftp\handheld\
Information about your Wireless Network
Please complete this form and return to Datapel Systems for Support Purposes
Wireless Access Information
SSID: _________________________________________
WEP: _________________________________________
Is MAC filtering turned on?: ___________
If yes, you need to request the MAC Address of the handheld scanner.
For each Handheld
The remote handhelds must have static IP Address(es). One per handheld unit required
Allocated IP Address: ___________________________________
Subnet Mask: _________________________________________
Gateway: _________________________________________
Ftp Server IP: _________________________________________
Ftp User: _(datapel)_______________________________
Ftp Password: _(datapel)_______________________________
UnitID: _(mobileXX)______________________________
Please complete the above information for each handheld device and return to Datapel Systems via Fax – 1300-134-955
Wireless Setup of Denso Handheld
Once ALL previous steps are completed, the Denso Unit must then be configured MANUALLY for RF communication. It is then the task of the IT Consultant or Datapel Partner to upload the NETWORK.DAT file containing the settings collected in the previous section.
The Network.DAT file contains fixed fields character length 15 for the name and 100 for the data. Below is an example of the network.dat file.
NOTE: You MUST always pad out the data with spaces to make the correct field width for all fields.
15 CHARACTERS 100 CHARACTERS
Unit IP Address 192.168.0.43
Subnet Mask 255.255.255.0
Gateway 192.168.0.155
Ftp Server IP 192.168.0.250
Ftp User datapel
Ftp Password datapel
Ftp Remote Dir /
AP Timeout 100
Socket Server 192.168.0.250
Socket Port 8888
UnitID Handheld
This file needs to be created and uploaded for each scanner with a different UnitID and Unit IP Address. This file will be used by the DATAPEL MOBILE program loaded into the Denso Unit to configure the connection of the wireless network necessary to send/receive data to and from the server.
Denso RF Setup
The wireless network settings are entered in the System menu of the scanner. Enter the system menu on the scanner by pressing SF + 1 then press PW while the scanner is in the off state. Refer to the Denso User Manual for more information.
Follow these instructions to setup the scanner for wireless access.
1. From the system menu press 8 for “RF” and ENT
2. Press 1 and ENT for the “PARAMETER” option
3. Press 1 and ENT for the “RF Network” option
4. Press 1 and ENT for the “Network Parameter” option
5. Press ENT to enter the SSID of the network (This is the Wireless Network Name). We recommend Handheld or DatapelMobile.
Use the SF key to type in Alpha codes and click the same number key to cycle through each letter and case.
Once the SSID is entered:
6. Press the ENT Key
7. Press the C key to go back up a menu level
8. Press 1 and ENT to confirm the change
9. Press the C Key to go back to the SET RF PARAMETER menu
10. Press 2 and ENT for the “SECURITY” option
11. Press 1 and ENT for “Security Mode”
12. Press 1 and ENT for None (When using WEP)
13. Press 1 and ENT to confirm the change
14. Press 2 and ENT for the “Configuration” option
15. Press 1 and ENT for the “WEP Option” Use F7 and F8 to select WEP ON and Set Authenticate to OPEN.
16. Press 1 and ENT to confirm changes
17. Press 2 and ENT for “WEP KEY1”
18. Choose KEY SIZE as either 40 or 128 bit using F7 and F8.
19. Press 6 and ENT then use F7 and F8 to select the KEY that corresponds with the KEY set in your Wireless Access Point. Datapel recommends using KEY1.
20. Press 1 and ENT. 21. Press ‘C’ and return to RF Menu.
22. Press 2 and ENT for “Site Survey”
23. Press 1 and ENT for “Link Status”
If your Wireless Setup has been successful, you will see information regarding the Access Points MAC-Address, the signal strength and quality of connection.
It is recommended this option be used to test all physical points of the warehouse where the DENSO scanner wil
Was this article helpful?
That’s Great!
Thank you for your feedback
Sorry! We couldn't be helpful
Thank you for your feedback
Feedback sent
We appreciate your effort and will try to fix the article